The weapons officer is in charge of the offensive capabilities of the ship. Based on orders from the captain, you'll be required to load requested ordnance into the torpedo tubes, target enemy vessels, fire torpedos and nukes, deploy mines and fire the primary beams. You'll also be responsible for tuning the beam frequencies to maximise damage output, monitoring the level of enemy shields and converting energy to torpedoes and vice versa.
For most ships, you'll have control over primary beam weapons and torpedo tubes. 4 kinds of ordnance can be loaded into torpedo tubes:
- Homing torpedoes - do moderate damage to a single ship, automatically locked on to the targeted vessel
- EMP torpedoes - disrupt shield generators with a large (1k distance) blast radius, automatically locked on to the targeted vessel and will home in on it. An EMP will generally render the shields of any vessel in the blast radius down to about half strength, subsequent EMPs will have little or no effect so there's not much point in firing 2 at the same ship. NOTE, EMPs are indiscriminate - if you, a friendly space station or friendly ship are caught in the blast radius they will suffer its effects - do NOT use in close combat or in the vicinity of space stations.
- Nuke torpedoes - do massive damage with a large (1k distance) blast radius, automatically locked on to the targeted vessel and will home in on it. For many enemy ships at lower difficultly levels, if they've already been hit with an EMP a nuke will do enough damage to destroy them. Again, nukes are indiscriminate, do not use in close quarters or in the vicinity of space stations.
- Mines - do massive damage with a large (1k distance) blast radius, launched from the rear of the ship and automatically armed shortly thereafter. Useful when being chased by enemies or as an area denial weapon.
Note that Homing torpedoes, nukes and EMPs will simply continue on a straight course if fired when there is no enemy vessel targeted. They will, however, still detonate if they come within close proximity to an enemy vessel.
The weapons station looks like this:
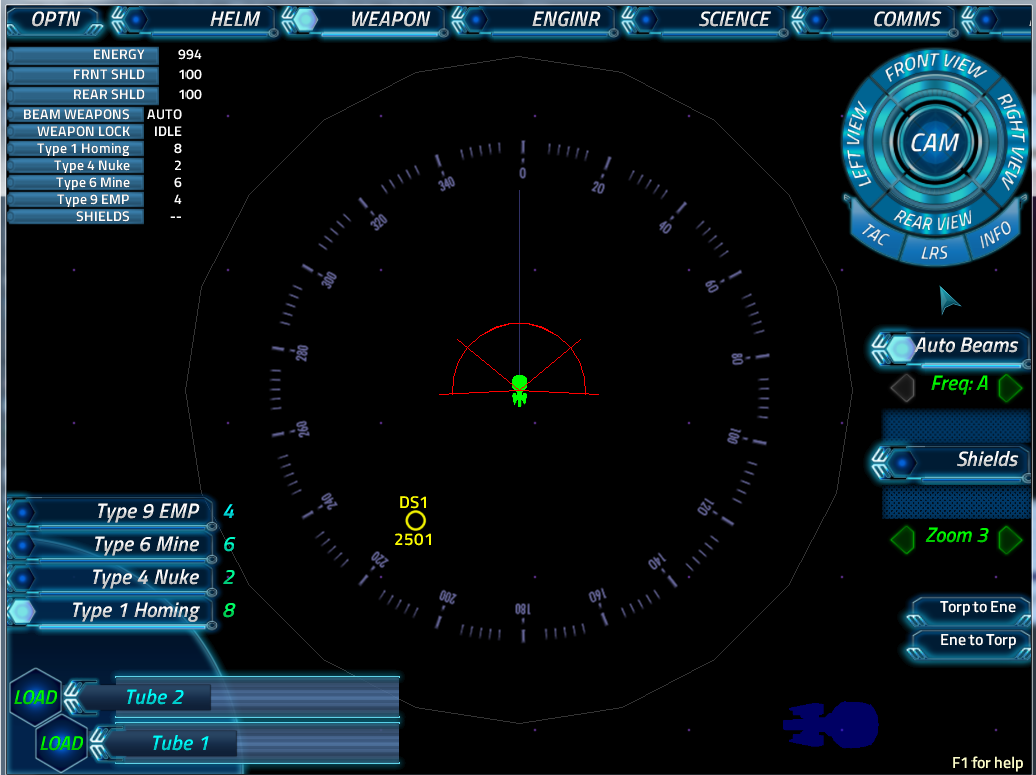
The red arc around the front of the ship shown indicates the firing arc of the ship's primary beam weapons. This ship has two beam weapons with overlapping arcs - both beams can target enemies in the wide central segment and only one beam can target enemies in either of the small left and right segments. When 'Auto Beams' is selected on the right of the screen, the primary beams will fire as often as they can at the targeted enemy, as long as it is within their firing arc.
Enemy vessels can be targeted by clicking or tapping them when they appear in the weapon station's view, sometimes double-tapping is required and it's a useful habit to get into. Once a vessel is targeted, both beam weapons and any guided ordnance will be directed to that vessel. Beams in auto mode will only fire on the targeted vessel.
In the top left of the screen is a summary of the ship's status, common to many of the stations. In the bottom left are the ordnance selection and torpedo tube controls. To load a specific type of ordnance into an empty tube, first sleect the type of ordnance required, then click/tap the load button for the appropriate tube. Tubes take a certain amount of time to load, and the speed at which they load can be adjusted by the engineering officer. Once a tube has been loaded, its 'Fire' button will be available. Clicking/tapping this button will launch the ordnance in the ways described above. If at any point you discover you have the wrong sort of ordnance loaded, the tube will have an 'Unload' button which will return the loaded ordnance to your stores, however this also takes time.